The previous article was pretty exciting. All our work setting up the element hierarchy with messaging and layout came together to allow us to build the painting infrastructure, which involved implementing update queueing, recursive rendering, and the Painter system. In this article we'll take a little break from the intensity of adding new systems, and instead flesh out the existing Painter system a bit by adding two new functions, DrawRectangle and DrawString.
Here's what the end result of this article's work will look like:
First, let's add DrawRectangle. This is similar to DrawBlock, except it draws 1px thick outline around the rectangle. Here's the function signature:
void DrawRectangle(Painter *painter, Rectangle r, uint32_t mainColor, uint32_t borderColor);Try to implement this one yourself, if you're following along! Hint: my implementation makes 5 calls to DrawBlock.
Second, let's add DrawString. This has signature:
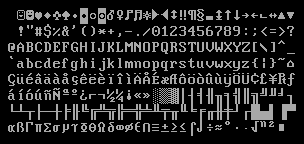
void DrawString(Painter *painter, Rectangle bounds, const char *string, size_t bytes, uint32_t color, bool centerAlign);For this we're going to need a font. To avoid getting lost in the rabbit hole of typography for this simple UI library, we going to use a monospaced bitmap fixed-size font, taken from here:
I converted the ASCII range of characters into a bitset array _font, which you can find in the source of this article. Each glyph is 8 pixels wide and 16 pixels tall, so each glyph fits nicely into 16 bytes of data. To determine whether a pixel is set or transparent, one may lookup the bit ((uint8_t *) _font)[character * 16 + row] & (1 << column).
We also define the following constants, giving the size of a glyph:
#define GLYPH_WIDTH (9) // 8px of data in the font, followed by a 1px gap between glyphs.
#define GLYPH_HEIGHT (16)
Finally, we can write the DrawString function. I will not go through this in excrutiating detail; it does pretty much what you'd expect from a software renderer.
void DrawString(Painter *painter, Rectangle bounds, const char *string, size_t bytes, uint32_t color, bool centerAlign) {
	// Setup the clipping region.
	Rectangle oldClip = painter->clip;
	painter->clip = RectangleIntersection(bounds, oldClip);

	// Work out where to start drawing the text within the provided bounds.
	int x = bounds.l;
	int y = (bounds.t + bounds.b - GLYPH_HEIGHT) / 2;
	if (centerAlign) { x += (bounds.r - bounds.l - bytes * GLYPH_WIDTH) / 2; }

	// For every character in the string...
	for (uintptr_t i = 0; i < bytes; i++) {
		uint8_t c = string[i];
		if (c > 127) c = '?';

		// Work out where the corresponding glyph is to be drawn.
		Rectangle rectangle = RectangleIntersection(painter->clip, RectangleMake(x, x + 8, y, y + 16));
		const uint8_t *data = (const uint8_t *) _font + c * 16;

		// Blit the glyph bits.
		for (int i = rectangle.t; i < rectangle.b; i++) {
			uint32_t *bits = painter->bits + i * painter->width + rectangle.l;
			uint8_t byte = data[i - y];

			for (int j = rectangle.l; j < rectangle.r; j++) {
				if (byte & (1 << (j - x))) {
					*bits = color;
				}

				bits++;
			}
		}

		// Advance to the position of the next glyph.
		x += GLYPH_WIDTH;
	}

	// Restore the old clipping region.
	painter->clip = oldClip;
}
The test usage code for this article creates just a single element, and demonstrates all 3 drawing functions in its MSG_PAINT message. Pretty sweet! Now we've got drawing text and bordered rectangles, in the next article we'll get started with mouse input, as we work our way to implementing user-interactable buttons.
 part7.c
